
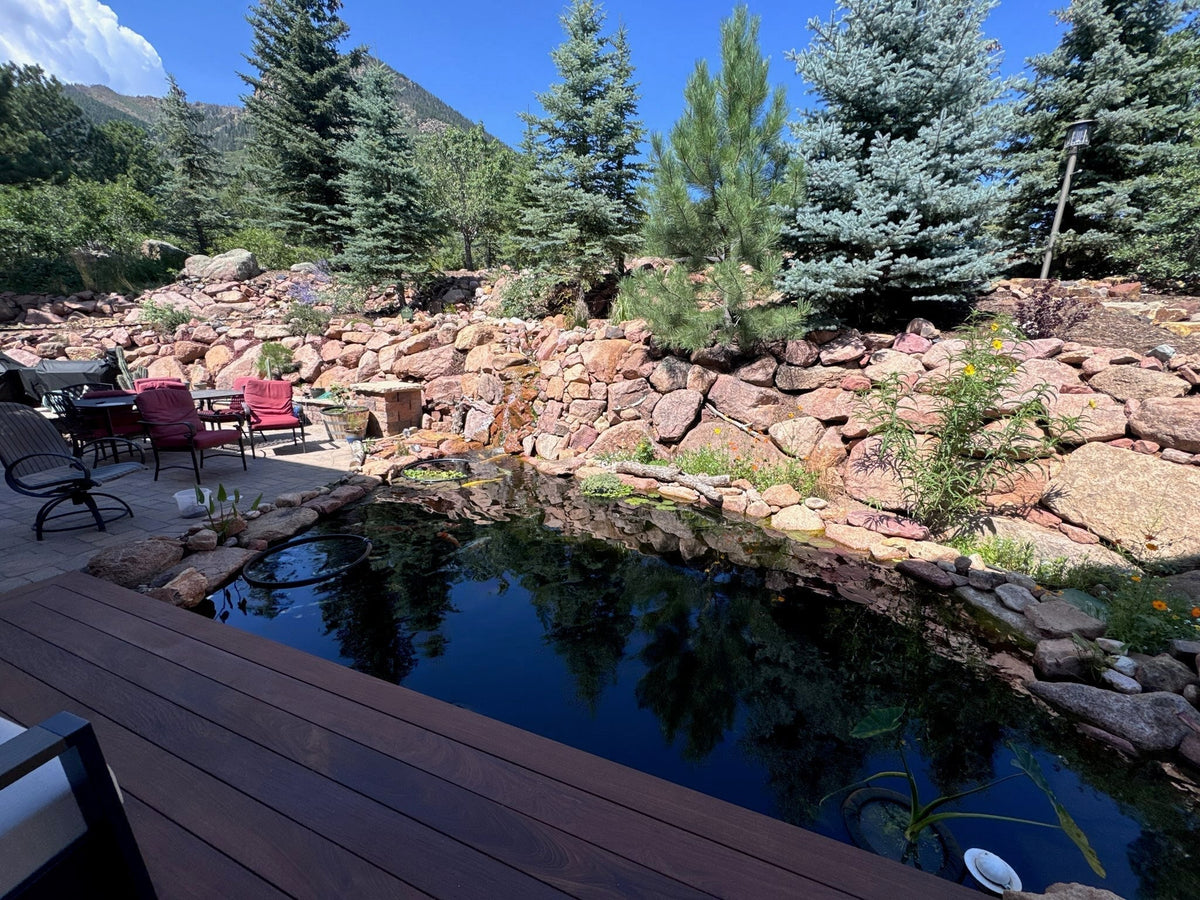
Tim Jardeleza had one rule for his new koi pond: it had to look like it had always been there. "I wanted something that looked natural and would blend in with the existing landscaping and our environment," he told us when he sent the finished photos. Over about a year he dug, poured and plumbed it himself on a foothills lot full of red granite: a 17-by-12-foot koi pond, 5 to 6 feet deep, with a waterfall spilling down a boulder wall, a hardwood deck right at the water's edge and a gravity-fed filtration system tucked into a shed by the house. His verdict: "Really happy with the results."

We rebuilt Tim's pond in 3D in our Pond Planner, waterfall and all. Skip ahead to explore it.
Tim's pond at a glance
- Built by: Tim Jardeleza, do it yourself, with planning help from Derek at Play It Koi
- Build: fall 2024 to summer 2025
- Size: 17 feet 2 inches by 12 feet 6 inches, 5 to 6 feet deep
- Shape: a kidney inside a poured concrete collar, with a narrow lobe where the waterfall comes in
- Filtration: bottom drain and two skimmers feeding a FREE drum filter by gravity, then a pump, an AlphaNANO 6.3 bead filter and a bog on the hillside
- Water features: a waterfall down the boulder wall, two tangential returns and a sidewall return
- Equipment: in a small shed on a 4-by-6-foot pad, 9 feet from the pond
- Edge: red granite boulders on the hill side, a flush hardwood deck on the house side, a stone patio at the waterfall end
Start with the flow, then dig
Tim already had a smaller pond with a Helix skimmer when he called Derek in August 2024. Before anyone talked about size, they talked about how water would move through the system. Derek's notes from that first call fit in one line: bottom drains, to a drum filter, through the pump and UV, maybe a pressure filter, then to a bog. Tim planned to break ground that fall and finish in spring.
That order is the heart of a low-maintenance koi pond. Bottom drains and skimmers carry waste out of the pond by gravity, a rotary drum filter screens the solids out before they break down, and only clean water reaches the pump. Everything after the pump, the bead filter and the bog, gets an easier job.
New to this? Our guide to bottom drains for koi ponds explains why the floor drain matters so much.
Excavator, collar and an equipment pad
Tim rented an excavator, and by early November he had his shape. "I finished up work with the excavator and now have a definite idea of the pond size and shape," he wrote, and sent us these photos with his measurements drawn right on them.

The basin as dug: 17'2" by 12'6", 5 to 6 feet deep, with a narrow 3'8" lobe at the waterfall end and the deck marked between the pond and the house.
A poured concrete collar rings the hole and gives the edge, the deck and the boulders something solid to sit on. The water line sits about 10 inches above the concrete, so the collar disappears once the pond is full. On the far side, Tim marked where the bog would go: on top of the boulder wall, about 8 feet above the water.

The bog goes up on the wall, 8 feet above the water. The water line is marked 10 inches above the collar.
He also poured a 4-by-6-foot pad against the house, 9 feet from the pond, for the filtration equipment.

The equipment pad sits 9 feet from the pond, close enough for short gravity lines.
The plumbing under the pond
Through the winter and into March, the pipes went in. A bottom drain sits at the center of the floor, and large gravity lines run in trenches to a block-walled pit at the equipment pad, each with a slide valve so it can be shut off for service.

Gravity lines with slide valves run into the equipment pit.

Where the lines meet the pit wall, beside the house.

March snow in the trench beside the collar, with the big lines in place.

March: the drain lines are in and the basin is ready for underlayment.
Tim also ran two 2-inch return lines, each about 30 feet long, for mid-water returns that push the water around the pond and back toward the drain and skimmers. One question came up along the way that a lot of builders ask: can you use an ABS fitting in a PVC drain line? Derek's answer: yes, "as long as you use the right adhesive to bond any PVC to ABS joints."

The two return lines, highlighted in blue, with the bottom drain at the center.
Liner in, water in
By mid-April the liner was down and the pond was filling. The folds still needed trimming and the boulders still had to go back on, but for the first time it held water.

April 2025: first water in the new pond.
Then, on the first of June, came the moment every pond builder waits for. "Yesterday was a little bit of a momentous day," Tim wrote. "I finally was able to get the plumbing running on the pond."
The equipment shed
All of the filtration lives in a small shed against the house, on the pad he poured in the fall. Inside, the FREE drum filter sits down in the block pit, low enough that the drain and skimmer lines feed it by gravity, with the PerformancePro ArtesianPro Dial-A-Flow pump beside it and a Matala air pump and 3-valve manifold on a shelf.

Inside the shed: the drum filter in its pit, the pump, and the air pump and manifold.
Outside, the AlphaNANO 6.3 bead filter and a manifold of ball valves sit on gravel next to the shed, where they're easy to reach. The AlphaNANO is rated for 20,000 gallons, several times Tim's volume, so it has plenty of room as his koi grow.

The finished shed, with the AlphaNANO and the valve manifold outside.

Inside the AlphaNANO 6.3. The 3-inch model uses slotted laterals to spread the water through the media.
The waterfall and the bog
From the filters, water climbs to the bog on top of the boulder wall through a 3-inch line about 50 feet long. Tim filled the bog with Aqua Blocks and planned it for 2,000 to 3,000 gallons an hour. Bog plants finish the job the filters started, pulling nutrients out of the water before algae can use them.
At the patio end, the falls tumble down the red granite into the narrow lobe of the pond. From the patio you see the water coming down the rocks, the koi under the lilies and the deck running along the house, all in one view.

The finished pond from the patio: the waterfall, the koi and the deck along the house.
Tim summed it up in one line: "Not too bad for some DIY work."
More ideas: our guides to building the waterfall of your dreams and choosing plants for a koi water garden.
Tim's equipment
From us:
- FREE 35 drum filter with the IoT Box, gravity-fed
- AlphaNANO 6.3 bead filter, 3-inch, rated for 20,000 gallons
- PerformancePro ArtesianPro Dial-A-Flow pump, High Flow 1.6N
- Kick Ass No-Niche skimmer, 3-inch, plus a Helix overflow kit and Matala pads for his existing Helix skimmer
- Tangential pond returns (TPR), 2-inch (two)
- Aquadyne Rhino I 2-inch sidewall return
- Matala 5/8-inch 3-valve air manifold
He sourced the bottom drain, liner, air pump, bog media, pipe and valves, the shed and the decking himself.
Plan a pond like Tim's
Now you can walk around Tim's pond yourself. We rebuilt it in our Pond Planner: the 17-foot-2 by 12-foot-6 kidney, 5 feet deep with a 6-foot middle, about 6,100 gallons, and a 3-foot-wide waterfall that drops 5 feet out of the boulders at the patio end. Underneath it runs Tim's system: an aerated bottom drain and two skimmers feeding a FREE drum filter by gravity, one ArtesianPro Dial-A-Flow pump, the AlphaNANO 6.3, two 2-inch tangential returns and a Rhino I sidewall return. A stone wall and pines stand in for his boulder hillside, and a deck with a pair of chairs runs along the house side. Here it is from the deck, from above and from across the water, followed by the 2D plan.


A few things differ from Tim's pond. His FREE 35 is out of stock right now, so the plan uses the FREE 60. The planner holds one skimmer model per plan, so his Helix and Kick Ass No-Niche show as two Helix skimmers, and the white pump house stands in for his shed. The planner doesn't draw a bog yet, and it adds a UV clarifier, which Tim's early plans mention but we couldn't match to a model. We also set the plan for six adult koi, the number his one pump turns over at the planner's rate. For a full dozen, the planner asks for more pump.
Open Tim's pond in the planner to spin it around in 3D, follow the gravity lines to the drum filter and see every part on the list. Like what you see? Hit "Start my own pond" and design yours.
Tim's pond shows what a patient DIY build can do: start with the flow, give the equipment its own spot, and let the rocks and plants do the rest.