
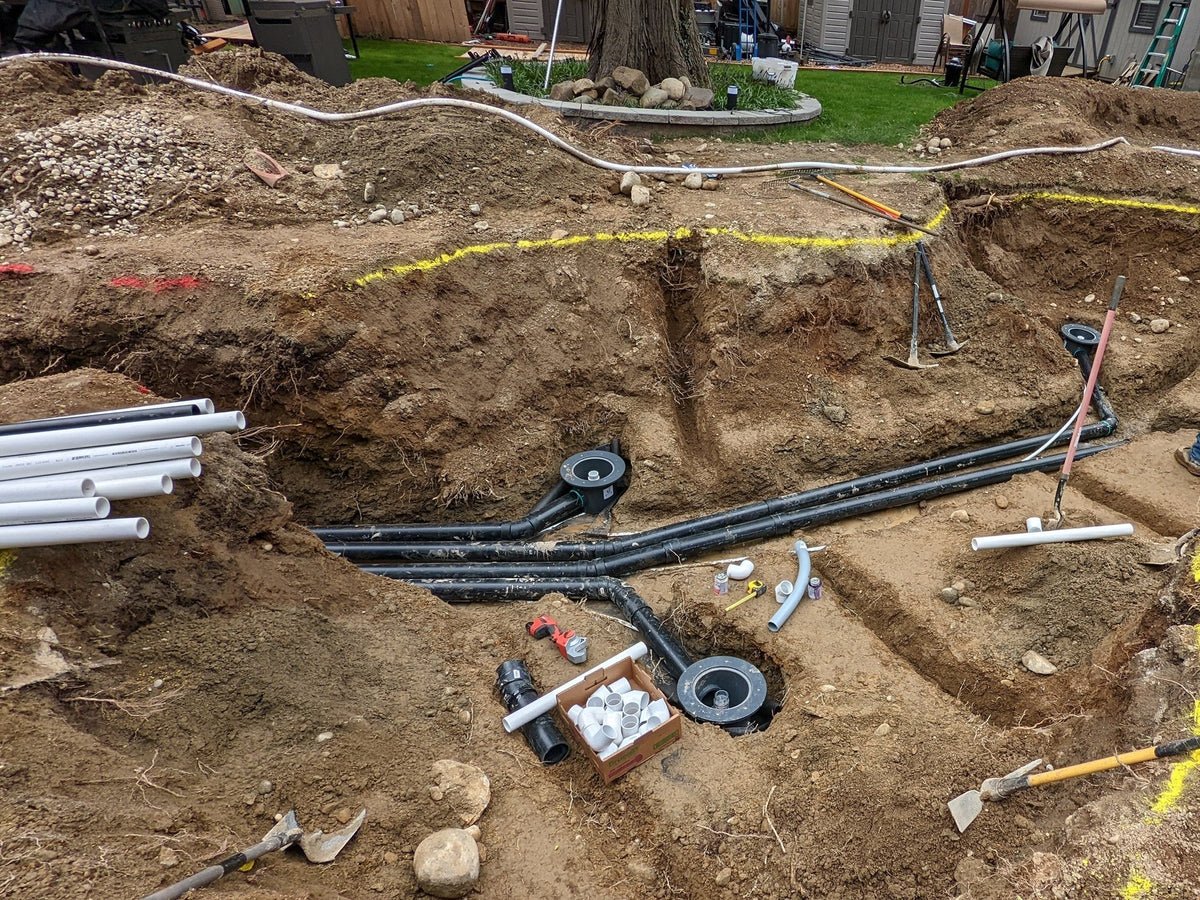
If you have spent any time around serious koi keepers, you have probably heard at least one of them say they wish they had installed a bottom drain from the start. It comes up constantly, and for good reason. It is one of those decisions that is easy and cheap when you are still in the planning phase, and genuinely painful to deal with after the fact.
This is not going to be a generic overview that tells you bottom drains exist and are a good idea. You probably already know that. This is the guide that walks you through the decisions that actually matter, so you can build something you are not going to spend the next decade wishing you had done differently.
What a Bottom Drain Actually Does
The premise is simple. Your fish produce waste, that waste sinks, and in a pond without a bottom drain, it sits there. As it decomposes, it releases ammonia. Ammonia is toxic to koi at concentrations that give no visible warning in the water. By the time the pond looks like a problem, you are already well behind it.
A bottom drain sits at the lowest point of your pond and continuously moves waste off the floor and into your filtration system, before it has a chance to break down. It also eliminates the dead zones that form in ponds with poor bottom circulation: pockets of low-oxygen, waste-saturated water where the bacteria you do not want get comfortable and multiply.
Get rid of those dead zones and your water quality improves across the board. Your filter works more efficiently. Your fish are less stressed. You spend less time maintaining the pond. It really does make that much of a difference.
Gravity-Fed vs. Pump-Fed: This Is the Fork in the Road
There are two fundamentally different ways to run a bottom drain, and which one you choose shapes your entire system design.
In a pump-fed setup, a submerged pump draws water from the pond and pushes it up into a filter positioned above the water level. It is the simpler option, easier to retrofit, and it works. The trade-off is that all of that waste-laden water passes through the pump impeller before it reaches any mechanical filtration. That means the solid waste gets chopped up before you can capture it, which makes it significantly harder to remove cleanly. Your pump basket also takes on more debris and needs more frequent attention as a result.
In a gravity-fed system, the bottom drain connects via large-diameter pipe to a filter chamber that sits at roughly the same water level as the pond. A pump at the outlet end of the filter draws clean, already-filtered water and returns it to the pond. The waste reaches your mechanical filtration completely intact. The pump only ever handles filtered water. It stays cleaner, runs more efficiently, and the overall system works better. It is a more involved build, but it is the setup most serious koi keepers land on eventually, and almost none of them go back.
If a rotary drum filter is part of your plan, this difference is a lot easier to see in motion than on paper. We built an interactive model of each setup so you can watch where the water actually goes: the pump-fed drum filter simulator and the gravity-fed drum filter simulator.
Here is the part that catches a lot of people off guard when planning a gravity-fed system: the diameter of your drain pipe sets your flow ceiling. A 4-inch gravity-fed line has a theoretical maximum of around 3,600 GPH. A 3-inch line caps around 1,800 GPH. If your pump tries to pull more than your drain can supply, the filter chamber runs dry. Your pump has to be sized to work within what your drain line can deliver, not the other way around.
And those are new-pipe numbers. Over time, the beneficial bacteria that do good work elsewhere in your pond also colonize the inside walls of your drain pipe. As that biofilm establishes and thickens, it physically narrows the effective flow area inside the pipe. On top of that, the biofilm dramatically roughens the pipe walls, which creates turbulence along the edges and reduces the center column of smooth, organized flow. The real-world delivery capacity of a mature drain line can be meaningfully lower than what you calculated on a clean pipe at installation. Plan your pump selection around that reality, not the theoretical maximum.
Built-In or Retrofit: Where Are You Right Now?
A traditional built-in bottom drain is installed during construction. The drain body is set into the pond base, a pipe run is dug from the drain to the filter location, and the liner is laid over the drain and clamped between two flanged rings with sealant. The liner itself becomes the gasket. This is the right way to do it if you are still in the planning phase. It enables true gravity-fed operation, keeps all of the plumbing out of sight, and gives you the most reliable long-term performance.
A retrofit drain is designed for ponds that are already built. It sits on top of the liner, weighted with sand or gravel in a ballast chamber, and connects to a pump via flexible hose. Is it better than nothing? Yes, genuinely so. Is it as good as a built-in drain? No.
Most retrofit drains end up running pump-fed rather than gravity-fed, because getting a reliable siphon through a large-diameter hose routed up and over a pond wall is difficult to maintain over time. There is also the matter of where the hose and airline actually go. In an in-ground pond, hoses over the edge are manageable. In an above-ground build where the wall face is visible, that usually ends up meaning one or two bulkheads through the wall anyway. The "no holes required" framing you see in some marketing does not always hold up once you start thinking through the aesthetics of the finished install.
If you are still in the building phase, put in a traditional drain. The cost and effort at that stage is a fraction of what it costs to deal with later.
Add the Air. It Is Worth It.
A standard bottom drain dome relies entirely on the suction from your filtration system to move debris across the pond floor. It works. An aerated drain works significantly better.
An aerated drain incorporates an air diffuser into or on top of the dome, connected to an external air pump. The rising column of bubbles above the drain creates an uplift effect that pulls debris in from a wider area, including fine particles like fish waste that would otherwise stay suspended in the water column indefinitely rather than getting drawn into the drain. That same column of air also oxygenates the water from the bottom up, prevents thermal stratification during summer heat, and discourages the conditions that allow harmful bacteria to take hold in low-oxygen zones.
You are essentially getting three jobs done by one fitting: improved waste capture, improved circulation, and improved dissolved oxygen. That is a lot of return for one upgrade.
If budget forces a trade-off between stepping up a drain size or adding aeration, go with the aeration. A well-aerated 3-inch drain will outperform a 4-inch drain running without air, especially in a smaller pond.
Getting the Plumbing Right
This is the section most build guides skip over, and it is where a lot of people create problems for themselves that are entirely avoidable.
Drain size. For most builds, go with 4 inches. Even if you are building a pump-fed system today with no plans to convert, 4-inch pipe keeps that option open later without needing to excavate anything. It also reduces water velocity through the line, which means waste reaches your filter more intact, and smaller fish are less at risk near the drain dome. The exception: for smaller ponds in the 800 to 1,000 gallon range with modest fish loads, a 3-inch drain can provide adequate turnover. At that scale, whether you add aeration is a more important question than whether you go 3-inch or 4-inch.
Use sweep bends. Wherever your pipe changes direction, use long-sweep fittings rather than standard tight 90-degree elbows. Better yet, build that turn using a pair of 45-degree fittings, or a 45-degree and a 22.5-degree, to make it gradually. Sharp 90-degree elbows are where debris accumulates, where blockages start, and where a drain snake is most likely to bind up and get stuck. In a buried pipe run, a blocked elbow is not a ten-minute fix. Sweep bends cost almost nothing extra and can save you a lot of grief.
Place the pipe reduction away from the pond. When you transition from the 4-inch drain run down to a smaller inlet size for your pump, do not put that reducer right at the drain. Keep the full 4-inch run all the way out to a point above grade and away from the pond edge, then make the reduction there. The reducer is where a blockage is most likely to develop: anything large enough to make it through the drain dome will tend to catch right at that narrowing. You want that fitting somewhere you can reach with a snake. Additionally, placing the reduction on the 4-inch pipe before it steps down preserves the full gravity-fed potential of the buried run if you ever convert the system later.
Put in cleanouts at transitions. A cleanout is a tee or wye fitting with a removable threaded cap. During a build, they add almost nothing in cost or time. After the build, they are the difference between clearing a blockage yourself in ten minutes and calling someone with a shovel. Place them on the larger-pipe side just upstream of any reducer, and near any elbow or significant change in direction in the buried run. Where they end up in the final grade is worth thinking through for aesthetics, but the priority is accessibility.
About Cutting That Hole
Yes, you have to cut a hole in the liner. No, that is not as scary as it feels.
When I installed my first bottom drain, I read the instructions more times than I would like to admit before I made that first cut. Not because they were complicated. Because it felt like the one thing in the whole build that could not be undone, and that kind of mental weight has a way of making simple things feel bigger than they are.
The reality is that the installation is straightforward. The liner is scored over the drain flange, then clamped between two flanged rings with sealant. The liner becomes the gasket. Quality drain flanges are machined with enough surface area that minor imperfections in the cut do not compromise the seal. These drains get installed every day, by people doing it for the first time, without issue. Follow the instructions carefully, use a quality product, and the concern is bigger than the actual risk.
Invest Where It Counts
The bottom drain is the last place to cut corners. A failed seal is a serious problem, and lower-cost options often mean thinner flanges, injection-molded components, and replacement parts that simply do not exist a few years after purchase. Air diaphragms wear out. Dome covers can crack or get damaged. If the manufacturer does not support their product with replacement parts down the road, you are eventually looking at a full drain replacement rather than a simple service call.
Higher-quality drains are built with machine-fabricated flanges designed to maintain a watertight seal over years of submersion, and the manufacturers back them long after the original sale.
The pond depends on the drain. Get that part right from the start.